Search This Blog

Wednesday, July 7, 2010

Summer = Free Time!


Whew! The end of the school year has finally arrived, and I have been able to let go enough of the stress that I can relax and get some creative work done. First out of the gate: Scrabble tile pendants!

My dear mom started collecting Scrabble tiles for me quite some time ago, and for the most part they have just sat, lonely, in their bin in my office. So after a very stressful Saturday, I stopped in at my local Big Box Craft Store (when they start offering me discounts to name them, I'll name them!) and bought some supplies.

I bought: a paper punch with a lovely scalloped edge just SLIGHTLY bigger than the tiles, a package of floral patterned chigoyami paper, a set of decoupaging brushes, some stamps and a glue stamp pad. Yes, a GLUE stamp pad! More on that later.

So here's the introductory pic:

This picture is one of 7 designs I punched out of one single square of chiyogami paper that measures about 3" x 3". You can see that a small fuzzy made its way into the glaze, but I think that will sand away after the glazing is finished.

Here's another; same packet of papers, different sheet. I love the roses on this one! Another part of the sheet has tiny pink roses and a big white rose.
Here's one final solo tile:

What's funny about THIS one, is it's the sheet I liked least, but I really like the way the pendant is turning out. The colours of the orchid really pop with the sealer! 

And here's the whole haul so far:


You can see the light from my flash glaring more on some because of the angles, but I really like how shiny these look after only 3 coats of sealer! After dinner, I will put a few more coats of sealer and start a second batch. After all: I cut 7 tiles out of 2pieces each of four designs!

(Be the first to comment with the math correct and I will send you a finished tile necklace on a black satin cord!)

Thursday, June 10, 2010

Bold new look...

So blogger has a new template designer...how do you like it? I was playing around and this is what I came up with. I am pretty happy with it so far, but that might just be the cough syrup talking....Good night!

Wednesday, May 19, 2010

Wow...

I just got my first look at the profile feature that Diana from painted Lady fingers wrote about me in her blog. For those of you who didn't get here from there, here's a link! I think I'm blushing....

As always, comments are welcomed and will ALL be answered!

My, how we are growing!


Over 100 of you along for the ride now...gee!!! I feel a sudden onslaught of performance anxiety! I always do better under pressure though, so I'm sure I will be fine! Well now that we are ALMOST to the halfway point of 2010, I took on a task today that I have been putting off forever!

"Put thine own house in order", right? I needed to get my office/jewellery studio in order so I knew what was what and what was where and what I needed and what I wanted to use. So, after I twisted my SUPER organized Mom's arm until she found a day to come over to help, it finally got done.

I freely admit that I am my father's daughter in most things. I adore my mom, but we are nothing alike in our thinking. She is concrete linear/ I am random abstract (we are both creative though...) So I told her what we needed to do and then she decided how to do it and broke it down into small chunks for me, and we got it done! It's not that I am a slob: I have a learning disability that makes my organization skills in general those of a hyperactive toddler on RedBull...if you give me a huge job to do without any ideas of how to break it down, I will either become completely overwhelmed or I will do it the least efficient way possible and may be distracted thirteen times before I ...oh look! A shiny thing!

So...this was the result. A wonderfully organized workspace!


There are two side by side racks here: the left one is for paperwork, packaging materials etc. The right hand one is jewellery supplies, tools, wire, etc.

A closer look at the jewellery rack shows the Swarovski rack, pearl rack, gemstone rack, some still to be bagged and sorted stones, Scrabble tiles for pendants, many MANY pairs of pliers and cutters, the world's largest collection of steel wool, hundreds of dollars worth of sterling silver wire, and a train case FULL of unset stones for ring making!

Here's a closer look at the plastic case at the top right...It is full of sterling silver clasps, toggles, findings and charms!
 Wow! There was a work table under there...who would have guessed?? You can see my magnifier there to the left, some stuff to be sorted, some silver jumprings, and...a table!


This is where the magic happens, kiddies: that's my desk top, and my desktop, complete with pen and paper journal, blogger dashboard, and about 150 pens.


And finally, here's the payoff...my sweet new (used) iPod touch! I've been wanting one forever, I found this one lightly used, and I grabbed it. And I may never take it off again...


 Sweet dreams all!

As always, I welcome and respond to any and all comments!

Tuesday, May 11, 2010

Giveaway Time!

I appear to have the plague, so no new creations right now, since I find typing an exhausting endeavour right now. But for those of you who don't already follow paintedLadyfingers' blog, here's a link to her amazing spring beauty giveaway! You should all check it out, and enter as many ways as you legitimately can!  Good luck, lovelies!

Monday, April 19, 2010

Giveaways Galore!

I love being given the chance to win something by blogging about something I already enjoy! It helps spread love about Etsy shops that I love, for one thing, and for another...well,  who doesn't like a chance to win free stuff?

The current blog offering the giveaway is called Life's Recipe and her current giveaway features soy wax melting tarts from the fabulous Auntie Di! It's Auntie Di who gave away a pair of my earrings last week in her blog, so I'm helping out by cross-promoting the tart give away you can find right here!

Good luck everyone!

Saturday, April 17, 2010

What's for Dinner, Wild?

Tonight I bring you: Homemade (nearly) from Scratch Chicken and Biscuits!

In my defense, I have, in the distant past, made this dish entirely from scratch: cooked the chicken breast, chopped the veggies, made the white sauce flavoured with bouillon, made the baking powder biscuits....but in all honesty, I really prefer this version. It takes far less time, tastes better, and is probably in the long run FAR more economical!

Here's what you do:
 Purchase one (or better yet, two!) rotisserie chickens from your favourite place to buy them. I get mine at Costco: the chickens are bigger, cheaper and better tasting than those at either of the two big grocery stores around here. What you see in the picture above is the skin and scraps I save for my dogs, 2 breasts saved for sammiches, and about 4 cups of torn up mixed white and dark chicken meat. I tear it by hand, because I think you lose less of the juices that way.  Set the meat aside, preheat the oven to 375 and start the sauce.


This is what it looks like: the drippings from the bottom of the package the chicken came in, and a small piece of cchicken fat. Whether it's chicken, turkey, beef or pork, you can't make proper gravy without fat! Heat this until it's almost all liquified. If you want, substitute butter or margarine for the chicken fat. In a real pinch you can even use vegetable shortening or oil, but the taste won't be the same!

When it's all liquified, shake some flour over it. There are places where you can buy special flour shakers and they tell you this will stop lumps, but I just dip a clean hand into the bag of flour usually, pinch up a small amount and sprinkle it fairly evenly across the surface of the heated fat, like so:
Now I use my nonstick whisk to whisk this into a paste. This is a roux, and it's essential to good gravy or white sauce. It looks kind of unappetizing even when it's done right, so let's skip to the next step: add your liquid. In this case, we're using milk.Whisk until all the large lumps are gone and it's got a nice smooth consistency. Don't worry if you have a few small lumps left at this point: they will likely cook down in the next steps.

What we have now, if we want to get fancy about it, is a chicken sauce veloutine.  Let it cook until it's slightly thickened, then add in my secret ingredient, the Better than Bouillon paste in chicken flavour.
I really like this product for a few reasons: no MSG, no artificial colouring or flavours, and much lower in Sodium than powdered or cubed bouillon products. Whisk that in. Now comes the time for your first major cheat:

I use about half a container. Mixing this with the homemade base makes for a better tasting sauce than either tastes on its own. Whisk until thoroughly combined and bring to a bubble, but not a full boil. Add frozen veggies to your taste. I used about 1.5 cups EACH of Peaches & Cream corn and Peas & Carrots mix. Add liberal amounts of fresh cracked black pepper. Use about as much as you think you need, then turn the crank on that sucker a few more times. I really prefer fresh cracked pepper, as I think it tastes spicier!

Let that bubble merrily away over medium heat for a bit. Take your chicken meat and place it in the bottom of your baking dish. Usually, I use a Pyrex dish but every once in a while, after Hubbs has busted his hump cleaning the entire kitchen, I will buy a disposable foil baking dish. That way, there is a lot less mess for me to neglect to clean up right away!  I used about 2 cups of my cooked chicken, and poured the sauce/veggie mix on...If needed, to distribute chicken and vegetables proportionally throughout the dish, stir with a wooden spoon. Then, set the mixture aside to mellow while you get the biscuits/dumplings ready.

 Yummy, huh?


In tonight's version I used prepared biscuit mix. Sometimes I use the buttermilk fridge biscuits, but I use the store brand, not the laughing little fat guy in the baker's hat brand, and I didn't want to go to THAT particular grocery store, so I went with the baking powder version.


I like to tinker with the flavour, so I added black pepper, grated parmesan, and mozza cheddar mix to the basic recipe on the box for drop biscuits. I confess...I don't like my dumplings all doughy on the bottom, so I always pop them on a baking pan and into the oven for 5-7 minutes just until the bottoms set. Then I pull 'em out and set them on the chicken mixture. Sprinkle some paprika on top to make it look pretty! (I really don't think it affects the taste much, but it does look nice!) Bake at 375 until the biscuits are browned and ready!
Dish up and enjoy!

Thursday, April 8, 2010

WOW!

I feel like the most popular kid at school...I guess people really love that hot pink Chalcedony in Auntie Di's giveaway featured here! It's been two days and already she has over 111 (love that number!) entries! I'll let you blog followers in on a secret: if you make a qualifying purchase (over $20)  from my shop, WildHeather Handcrafted, while this giveaway is on, I will GIVE you a pair of these babies!!! The only catch is you must tell me in Notes to Seller that you are following "My Jewellery Box".

Wheeee!!!!

Tuesday, April 6, 2010

April Already...

Where does the time go?

 I have been lazy lately. Well no, not really, it's just that my life outside the jewellery sphere has been so hectic and surreal lately that I haven't had time to sit in my jewellery room and let ideas percolate. I've also been out of some fairly integral materials for quite a while, which makes it challenging. However, I thought that I should probably blog SOMETHING today for all the new folks (waves at new folks!) so that they get the idea that there is still someone home here, and something going on here, so I thought I'd post some oldies but goodies and invite some discussion. Everyone have their caffeinated beverage of choice in hand??
This is one of the first designs that I ever offered for sale. They were available only to my coworkers at first, because I knew not of Etsy. At this point, everything I used was store-bought: headpins, earwires and of course Swarovski crystals and the pink ribbon beads.

These pearls were so unique; this bracelet didn't last long in my shop! I was happy that it went to a very local buyer who it looks like it was made for with her auburn hair and Celtic complexion! I still have some of these pearls among my stash...might be making something new with them soon!

Beautiful bracelet, custom ordered for a beautiful bride.This was fun to do, and the bride was local. She came with me to select the pearls and everything! SO much fun.

So what's next? Stay tuned!

Monday, April 5, 2010

Giveaway Part Trois!

(That's French! :-D)

The fabulous Diann of Auntie Di's De-Lites is featuring me again in her blog's giveaway this week! If you are not already following her, check it out here!! Auntie Di's Blog! That will link you with her blog, her shop and all the other ways you can enter! Good luck everyone!!!

Wednesday, March 24, 2010

50 Followers Giveaway!

Willie is happy to announce that the giveaway winner is.... Alison!!! Check out her lovely shop, LaVitaPura on Etsy. Alison blogged, tweeted and posted the giveaway so her three entries out of the 8 total gave her a slight edge. Congrats, Alison, and I will send your gift certificates out right away!

Tuesday, March 16, 2010

My other pursuits

Besides making jewellery, one of my latest and favourite obsessions is knitting. Specifically, I love to knit scarves! They're easy and mindless and I can do them while I watch tv without even thinking about it! I love rich jewel toned colours (huh...go figure!) and soft fluffy yarns that are easy to work with. I love Lion Brand Homespun because it's machine washable and dryable (and if you know me well, you know that I spill...a lot...) and soft and ooomphy! (What? It's a word!!)

Willie concurs. (Scarves shown are in Lion Brand Homespun in Waterfall, and Barrington)

WE DID IT!

As of this morning, I am at 50 followers! You guys rock!

To celebrate, I am giving away a $10 gift certificate for my shop, along with a BOGO 50% off coupon*! Wow!  Here's all you have to do to enter...

1) Leave a comment here telling which is your favourite item in my shop (1 entry)
2) Retweet this msg "#wildheather is having her first blog giveaway" and link it to my back to my blog (1 entry)
3) Blog about it on your own blog and post a link to it (1 entry)

See? Easy!!

*Fine details: $10 certificate can be used towards any item. BOGO coupon will give you 50% off your lower priced of two items.


Good luck! Now go spam the intarwebs with my sparkly goodness!!!

Sunday, March 14, 2010

What I did yesterday...

besides walk the dogs twice and chat, that is...

Here in all its glory is the necklace I have named Ostara. I felt it was appropriate, and ties into the celebrations of the equinox, the lengthening days, and a nod to my distant Viking heritage. It's also appropriate for the Labradorite to be on a Viking knit piece, since what remains of the first European settlement in North America, called L'ainse aux Meadows, is in Labrador!
Here's how it looks in my shop!

Saturday, March 13, 2010

Coming Attractions!

I started thinking about this necklace as soon as I bought this pendant. I had the Viking knit made already, and just had to get the rest of it visualised and solve the problem of getting the wire through the Viking knit piece, since it was drawn down so fine. Then I made the spiral wire end caps, and put the rest of the pieces together and there you have it! I will cobble together some matching earrings tomorrow and then list it in my shop! But you, dear readers, get to see it first!
 Labradorite & Silver Necklace: Ostara

Fruits of my labours!

Here's the first look at what I am putting together out of my hoard from yesterday!


Don't these look luxe? I love this bead shape! It is so edgy and classy at the same time!

And then, speaking of a funky edge with the cool texture of brushed silver, we have the Half Shell earrings!

These had 25 views in the first 3 minutes I had them listed! Let's hope they get snatched up to a good home just as quick!

Inspiration strikes!

Who knew all it took was more materials? *eyeroll*...

But seriously folks, for the first time in quite a while I am finding myself really inspired to create new things after my trip to the Fraser Valley Bead Show last night. Many shinies were purchased and squirrelled away, but I am proud to say that I already have 2 new pairs of earrings to list tomorrow and a necklace that I may or may not list: I might just put it up to see if it gets any nibblings. It is silver viking knit, a bezel set labradorite pendant and labradorite rondelles so far: can't quite decide what kind of chain it needs. Handforged, I'm thinking, to give it that ancient look. One thing is for sure: it is gonna be a stunner!


The whole stash... except you can't quite see the yellow jade, the bright Thai silver toggles, or the round brushed silver beads, but you see enough to get the general idea, right?

Thursday, March 11, 2010

We love FREE!

Time to post another giveaway! Here's a chance to win an awesome candle, and find another great blog to follow! Mrs. B. over at Confessions of a Pagan Soccer mom, is giving away a candle from Auntie Di's De-lites! Go and get you some! http://silvermoonwitch.blogspot.com/2010/03/giveaway-from-auntie-dis-de-lites.html

Wednesday, March 10, 2010

Wedding Wedding : Update the first!

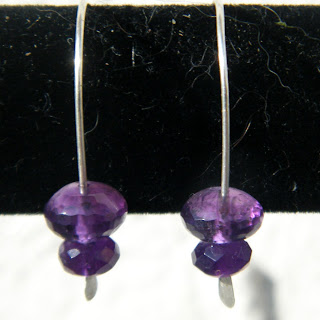
I got the chance to spend some time with my darling Maudie today (my mom, Deanna; hence Ma Dea = Maudie) She informed me that for Little Sister's wedding in July, the flowers will all be purple. WELL..that makes it easy now, doesn't it? The wedding jewellery will all be amethysts, and I am thinking just for fun, throw in some peridot accents on each piece! This is good for a couple of reasons: One; I have lots of amethysts already in stock. It's one of my favourite stones!


See?  These babies were a particular fave.

Same small rondelles on the bottom, slightly larger ones on top.

I have lilac amethysts too.

So I have a place to start from, and that's as good as anything...


Sunday, March 7, 2010

Wedding Wedding Wedding

I am thrilled to have been asked to create bridal and wedding party jewellery for an event on the 31st of July of this year. I am particularly thrilled because I get to keep one set for myself since I am the sister of the bride! Congrats to Micha and Rob! 


In our earliest discussions, we've talked about doing an identical style for all 5 girls (4 bridesmaids and a soloist) but with different stones in them according to each girl's taste. I've also mentioned picking one stone and having 5 slightly differing styles to suit each girl. I figured that way I could really maximise the quality of the strands of stones I was using without having to necessarily buy a lot of stones to make it! I don't want to charge her up the wazzoo for it: she is my sister after all! However, since Micha is giving these as gifts to her attendants, I want something that each girl will wear forever as a reminder of her friendship with Micha and of the day...

More on this story as it develops, but meantime...thoughts? Opinions?  If you were in the wedding party would you prefer a piece of jewellery in your favourite stone, or in a stone you maybe hadn't had a chance to wear before in a style that suited you???

Inquiring minds want to know!!!

Tuesday, March 2, 2010

Giveaway!

My dear friend Auntie Di of the Tempting Tart, Auntie Di's De-Lites, et al, is having a great giveaway on her blog! Check it out here:http://auntiedis.blogspot.com/2010/03/life-is-too-short-for-mediocre-candles.html

Monday, February 22, 2010

Sunday, February 21, 2010

Lazy Sunday: WildWildlife

I have a section of my Etsy shop that is reserved for one of my other big passions: wildlife photography. I feel blessed to call one of the most beaufiful places in the world my home:  British Columbia. I haven't been lucky enough to visit the whole province yet, but I am confident that in all its vast biodiversity, there are visually stunning landscapes to be found in its every corner! Today, I'd like to share with you one of my favourite places and one of my favourite species to photograph. Again, I feel blessed to be able to see these so abundantly in the wild that, around here, people take them for granted, when there are places in the US and Canada where people have only seen them in sanctuaries and zoos. I am talking of course of the incredible majesty that is a bald eagle.

The resident bald eagle population in BC is thought to number about 20,000. During the winter months, this swells when some of the Alaska population comes south to breed. Although bald eagles are naturally opportunistic feeders*, they are classed as a sea eagle, so their preferred habitat is close to the ocean. This location fits the bill nicely. It's an abandoned Canadian Forces Base located in Boundary Bay BC. It is home to a number of species of birds year round, as well as to several family groups of eagles. Yesterday morning, we ventured out to see how many we could see. We were very well rewarded, spotting no fewer than (and possibly more than) a dozen individuals. In fact, when we first arrived, we were greeted by a sentry at the entrance to the base. It was a very large mature individual in full immaculate plumage; probably a big female (Interesting fact: bald eagles are sexually dimorphic: the mature females are 25% larger than the males.)

Isn't she stunning? She sat there all morning long, completely unconcerned about any of us with our cameras, barely even deigning to look down upon us. My dogs she ignored completely, dismissing them as too big to bother with. This spot is very popular with local dog owners, and owners of small dogs have told me that they are keeping their dogs closer than usual, as the sight of a smaller dog will often put the birds up in the air to circle overhead; opportunistic feeders indeed? Why wait for a wily young rabbit to flush when you can snack on  a nice juicy Chihuahua instead? 

At another point we saw a pair of young juveniles in a tree. They appear to be first year juveniles; their plumage is still all dark, as are their eyes, but the cere of the beak is yellow already, as are their feet. 

It continually amazes me that I can walk almost up under them, until they decide they have had enough. Then, if you are REALLY fortunate, you get a shot like this...


This print, entitled TAKEOFF, will be available for purchase in a limited edition 8 x 10 metallic black & white print,suitable for framing, in my Etsy shop. It will sell for $35 plus shipping, and $7 from every purchase will go to Delta Orphaned Wildlife. You can also enter to win a limited edition colour 5x7 print by visiting Auntie Di's blog, here....http://auntiedis.blogspot.com/2010/02/purdythings-beat-monday-blahs-give-away.html where I will be this week's Beat the Monday Blahs featured guest!

Saturday, February 20, 2010

Other things...

So, besides jewellery, and cooking, I love to knit. Specifically, I love knitting scarves and shawls, because they're easy and uncomplicated, and I find the repetition very soothing. Almost meditative. Since I've been off work, I have knit myself 3 scarves and a 'prayer shawl' that I love (but Mr. Wild* calls me "Granny" when I wear it outside the house) plus one scarf for my sister in law. I've knit all but one scarf in Lion Brand Homespun, because I love the feel and texture of it, and that it's machine washable and dryer safe. I also love the 29 or so colourways that it's available in. In fact I love it so much that all 4 (and the 2 unfinished/ongoing) finished projects have been in different colours!

A scarf is one skein, the shawl is 3 (though the pattern says 4, I disagree). The latest scarf is done in a colourway called Waterfall, and in seed stitch. It is cast on in an uneven number of stitches, and then knit1 purl 1 every row until it's the length you want. Add a fringe, and presto!

Clearly, Willie approves.

*NOT his real name, clearly, However, using his real name to 'talk about him on the Internet' is verboten.

Thursday, January 14, 2010

What's for Dinner, Wild? (In which I channel my inner Alton Brown...)

I thought I might change things up a little and include a recipe post, since all the cool kids do it! I really enjoy cooking, but with just the Mr. and me, I don’t get too fancy too often. This isn’t fancy either, just a favourite dinner that combines simple ingredients in a really yummy way. It’s made even simpler with help from your local Costco. Without further ado, I present: Garlic Pepper Chicken and Brazilian Rice, with step by step pictures, yet!!!


Here’s what you need to start:

Brazilian Rice:

1 cup long rain white rice*

25 ml (1/8 cup) vegetable oil (Plain old canola works just fine: tart it up with EVOO if you wanna)

about 2/3 of a medium onion, diced

½ tsp minced pure garlic (I don't mince my own: I use a 100% pure minced garlic product)

Coarse ground black pepper to taste

Better than Bouillon paste, Chicken Flavour

2 cups hot water


(Lovely food stylist shot here...)
Directions:

Heat oil in a medium saucepan with a tight-fitting lid.

Combine onions, garlic, and black pepper. (You could also throw in just a pinch of kosher salt here, but I forgot today)

(I admit...I don't like onions. Never have, never will. HOWEVER, I double the amount the recipe calls for, and chop them coarser, because I like the flavour they give the rice.
 Yes,  it's contradictory: have you MET me?

A tip to start:  wash your rice. I know, you stopped washing rice a long time ago, right? Me too.


(Washed rice in my lovely big Pampered Chef Measure and Pour!)
DON’T!! Washing rice helps break down the starches and gives you a much fluffier finished product. Plus it’s fun! Just fill a bigger bowl than you need with warm water and rub the rice together between your palms until the water looks more like milk! (Also, I have to say, I think the rice water is good for softening my hands. More research required.) Drain carefully.

Brown in hot oil until golden (or until it smells right! HA!) Then, pour in your washed rice and let it pick up the lovely flavours of the browned onion garlic mixture.


(A tad more browned than usual, due to a wicked headcold...)
Now. About this here bouillon paste.


(Happily accepting endorsements, should any be forthcoming...)

I like the flavour of this better than any other bouillon around. It comes in Chicken, Beef, Pork, Vegetable and Turkey flavours. This is my personal spin on the original recipe, true, but I’ll never buy anything else but this again. Add a generous half teaspoon to your hot water.

Pour over hot rice mixture and bring to a boil.


Reduce heat, cover and simmer 20-25 minutes until all water is absorbed. Fluff with a fork. Serve immediately as a side dish. This is portioned for 4 servings, but I swear I could eat the whole thing myself.

Costco Garlic Pepper Chicken

This comes oven-ready, so it's not really a recipe as much as it is a pointer. If you haven't had it before, I highly recommend it! It is a really nice blend of chili, garlic and other spices, marinating nice thick split chicken breasts with the backs removed. Because it's Costco, it comes 5 breasts to a package, so I either split it into packages of 3 and 2, or I cook it all and make really yummy flavourful sandwiches the next day with the leftovers. They would be really yummy thrown into leftover Indian food.


(Once again, happy to endorse...)

Here are my tips: Cook it in a Pyrex baking dish. It's relatively easy to clean and you get even heat, whether your oven is predictable or not (mine is not!)

Cook it about 350 degrees (more if you have a 'slow' oven. Again, mine is not. It's fast. In other words, the heat isn't accurate and if I don't want my meals to burn I either have to adjust temperature or timing or both) for about 50 minutes.


(Rest well, little chickens...)

Then, pull it out of the oven and let it sit, foil covered, while you put the meal together. I think I read this tip on Mrs. B's blog, and I am following it from now on. To this, let me add...never EVER cook your chicken breasts with the skin OFF. Ever. Give it to your hubby to eat, or the cat, or the dog, or throw it away if you must, but cooking chicken breasts with the skin on makes 'em taste better and keeps them more moist!

So...there you have it, and here's how it looked all plated up.

(Yummo, indeed!)

Don't you wish you'd been here?


Enjoy!

Monday, January 4, 2010

Brag just a little

I am so impressed with how this ring turned out!!

Remember this garnet?


Very pretty, but not too impressive on its own. It had nice colour and clarity, but little did I know what it would look like after I set it.

I'm not going to say too much about how I made the ring shank. I will say that I really like the shape of it and will strive to duplicate it for many future projects! It was hammer textured and then brush finished before it was tumbled. I had to set it into a premade bezel cup, but future rings will feature handmade bezels. Here's the finished ring:


This picture was taken with the ring sitting on my bench anvil! It would have been nice if I had remembered to polish the stone quickly first. The white reflection is my full spectrum magnifying light overhead, mimicking natural daylight.


A closeup view so you can see the texture in the band. In this view it's possible to see a little bit of the E6000 jewellery adhesive I used on the back of the cabochon, because it wasn't fully set yet. Now that it has had time to cure, you can't see it anymore.

And finally,


How it looks on my finger! Because that's what's most important, right? I am really quite taken with this ring, I must say, especially now that I have wiped the shmutz off of it! :-D

And what did you do today?